appscripting
Google Apps Script Tutorial: Creating Time Tracker, a Spreadsheet sidebar app
Google Apps Script is a big subject with a long history and very few complete tutorials. I had a deceptively simple question that ended up as this article: what does a minimum, typical Google Apps Script program look like and what are current best practices? All the existing tutorials I know about leave a huge amount unsaid, and work best if you already know Apps Script.
Most Apps Script programs start with some kind of user input. That normally requires a custom form. Custom forms use HTML and are translated into Javascript objects in Google Apps, and they function very differently from the branded Google Forms. This app will appear as a sidebar on a spreadsheet. It gets built automatically by the built-in ‘onOpen()’ function, whch is triggered when the spreadsheet is first loaded. When you choose it from the menu, the sidebar itself is created and displayed.
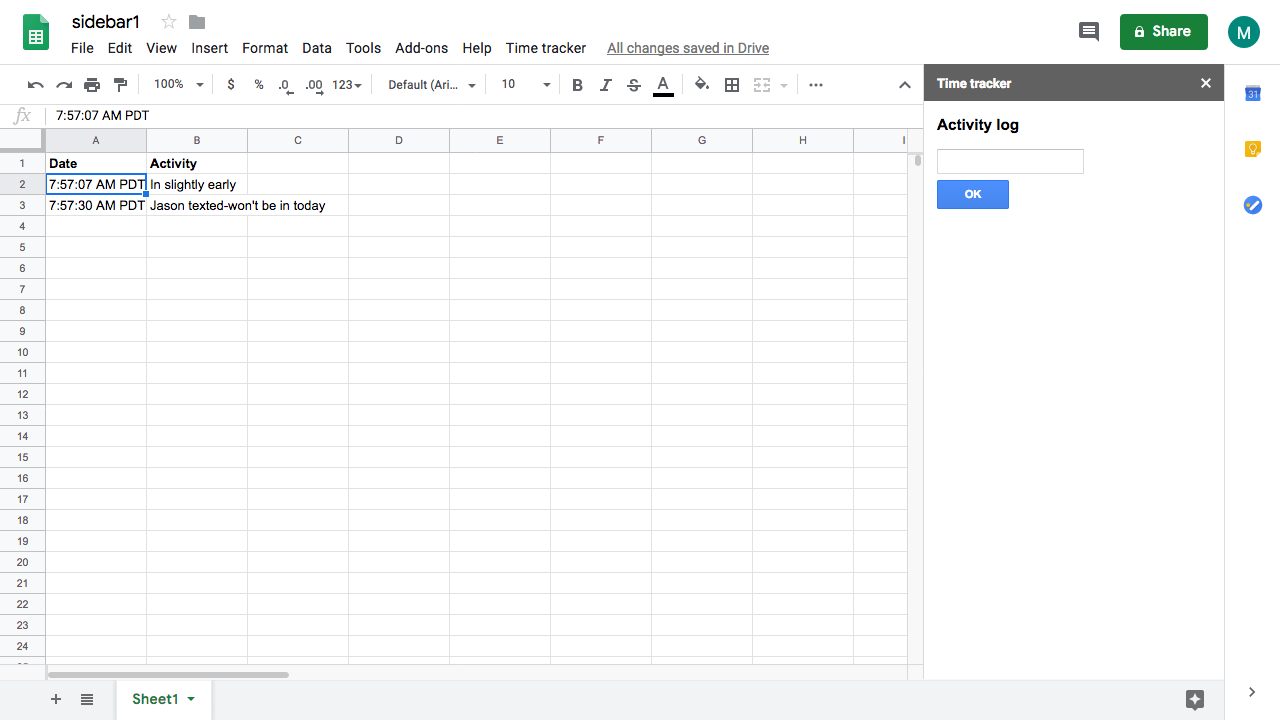
This tutorial shows you step by step how to create the simple activity tracker shown below, which lets you jot down something you did, then timestamps it and appends both items to the end of a spreadsheet.
Features of the final product:
- Written using Google’s current best practices, with complete explanations each step of the way
- Code is modular and uses JSDoc conventions
- Supports ARIA accessibility features
- Shows how to write server-side scripting code that adds a top-level menu item to the Spreadsheet service
- Shows how to add a menu item to the menu
- Includes a custom form using Google’s own style sheet. This is used to create the sidebar
- Shows how to obtain data from the HTML form and send it to the server-side script for processing
- Time Tracker is a useful if minimal app. You just type into a textbox on the sidebar, choose OK or press Enter, and a new row is added to the spreadsheet. The first cell of the row gets the current time inserted automatically, and the second cell is your note.
- Not counting comments, takes only about 15 lines of Javascript and 30 lines of HTML
Write a function to build the sidebar when a user opens the spreadsheet
- Create a spreadsheet and open the script editor as shown in The Google Apps Script onOpen() event,
but replace the
onOpenfunction inCode.gswith this:
file: Code.gs
/**
 * @OnlyCurrentDoc
 */

/**
 * Built-in function that runs when a spreadsheet is loaded.
 */
function onOpen(e) {
    // Create a high-level menu named 'Sidebar'
    SpreadsheetApp.getUi()
        .createMenu('Time tracker')
        // Add a menu item called 'Show Sidebar'
        // that runs the function showSidebar.
        .addItem('Show time tracker', 'showSidebar')
        // Attach it to the main menu bar.
        .addToUi();
 }
Called when the spreadsheet is lodaed, this function obtains a reference to the UI object, creates a custom
menu with its own title and a single menu item, then attaches
the new menu to to the spreadsheet’s UI and
displays it. When you choose the
one menu item, a function called showSidebar() gets called.
You can give that function any name.
The e argument represents the event that triggered this function, in this case then onOpen()
event. We don’t need to use its properties.
Write a function that executes when the menu item is chosen
According to the onOpen() code, when the user chooses Show time tracker
the function showSidebar() runs. showSidebar() is where the sidebar
its self gets displayed.
Let’s add this function to the file Code.gs:
file: Code.gs
/**
 * User-defined function that gets called when
 * the sidebar needs to be displayed in the UI.
 * It doesn't have to be named 'sidebar.html'.
 * But doing so makes it easier to share code.
 */
function showSidebar() {
  // Create a javascript object of type HtmlOutput from the
  // named 'html' file, which in this case is sidebar.html,
  // but omit the '.html' extension.
  // Give the title bar the lable "Time tracker"
  var ui = HtmlService.createHtmlOutputFromFile('sidebar')
      .setTitle('Time tracker');
  // Display the sidebar. This can take a couple of seconds.
  SpreadsheetApp.getUi().showSidebar(ui);
}
Write a server-side function to be called from the HTML
We’re getting a little premature here, but the remaining code below gets called from the HTML. In this case, it will be run when the user clicks the OK button.
Add this to the file Code.gs:
file: Code.gs
/**
 * Obtain information from the sidebaar
 * and make it available to the server.
 * Server-side, user-defined functions
 * like this one become part of the
 * globally visible google.script.run object.
 * That means that they're visible to the
 * "client" HTML code and can be called
 * from them like this:
 * google.escript.run.activityLog("hello, world.")
 * @param {string} activity - Description of event to add to log
 */
 function activityLog(activity) {
  // For obtaining the current time
  var d = new Date();
  // This is a single call that obtains
  // the spreadsheet being used at the moment.
  // You pass an array of any size to appendRow(),
  // and it adds a row to the end of the spreadsheet
  // with each element of the array in an adjacent cell.
  SpreadsheetApp.getActiveSpreadsheet()
    .getSheets()[0]
    .appendRow([d.toLocaleTimeString(), activity])
 }
- Press Ctrl+S (Command+S on Macintosh) to save the file.
Create an HTML file for the form
The sidebar is a custom form using HTML syntax. Start an HTML file:
- From the File menu, choose New, then HTML file.
A dialog appears asking you to give the file a name.
Remember that the name of an HTML file gets passed to
HtmlService.createHtmlOutputFromFile()? The name we
established for it was sidebar.html, but remember
there’s no need for the file extension, so the
code above is HtmlService.createHtmlOutputFromFile('sidebar')
- Enter the filename without
.html, so just the wordsidebarin this case.
A new tab with the code appears. Enter this code, which describes a very simple user interfact:
- A header to remind the user what the sidebar does
- An unlabeled textbox used for activities to track
- An OK button that causes the activity to be added to the spreadsheet
It includes Google’s add-ons1.cs to help give your
app a GSuite-compatible look and feel, and an early but
very capable version of jQuery that
streamlines the HTML you need to write and can be
used for the script’s event loop.
file: sidebar.html
<!DOCTYPE html>
<html>
  <head>
    <base target="_top">
       <!-- Make it look Googly -->
    <link rel="stylesheet" href="https://ssl.gstatic.com/docs/script/css/add-ons1.css">
    <!-- Give the UI a little breathing room -->
    <style>form { margin-left: 1em; } button { margin-top: .5em; } .help { visibility: hidden; }</style>
    </head>
   <body>
    <form>
     <h3>Activity log</h3>
     <!-- Single text box with OK button.
     Enter text to be logged, and it will be passed
     pack to the server to be written to the spreadsheet
     along with the current time. -->
     <input type="text"
       id="activity-note"
       tabindex="0"
       aria-describedby="activity-note-description">
     <div>
      <!-- class=blue is supplied by ad-ons1.css -->
      <button class="blue"
        id="ok-button"
        tabindex="1"
        aria-describedby="ok-button-description"
        >OK</button>
     </div>
    <form/>
    <p id="activity-note-description"
        class="help">
        Type in an activity to track</p>
    <p id="ok-button-description"
        class="help">
        Adds this note to the spreadsheet</p>
   <body/>
<html/>


<!-- Use jquery to clarify and abridge Javascript code. -->
<script src="//ajax.googleapis.com/ajax/libs/jquery/1.9.1/jquery.min.js"></script>

<script>

/**
 * This jQuery() function runs when the page is finished loading.
 * It is unsafe to start executing code before that moment.
 * Think of it as the main event loop.
 */
$(function() {
  // Attach a click handler to the button
  // whose `id` element is `ok-button`.
  // There should be no other elements
  // with that ID.
  $('#ok-button').click(getActivityNote);
});

/**
 * Called when the user clicks the OK button.
 * This function could be called anything.
 * Just make sure it matches the click() event
 * code, which in this case only exists for
 * the element named '#ok-button'.
 * User-defined functions in your HTML
 * be named activityLog(). It becomes part of the
 * globally visible google.script.run object.
 */
 function getActivityNote() {
  // Obtain the value of the text box whose
  // `id` element was set to `description`.
  // Send it to the server. If a function named
  // activityLog() can be found in Code.gs or
  // any other .gs files, it can use the
  // description to add a new row to the spreadsheet.
  // The function name activityLog() is user-defined
  // and could be named anything you want.
  google.script.run.activityLog($("#activity-note").val())
}
</script>
Whew! What’s going on here?
Google Apps Script doesn’t host HTML and render it the way you’d think.
For security reasons HTML isn’t run directly. It’s stripped of dangerous
script tags and other potentially dangers features. So
it actually converts the HTML and CSS into Javascript objects. That’s what’s
happening when HtmlService.createHtmlOutputFromFile() takes the sidebar.html
file (which we’ll create in a moment) as input and returns a Javascript object
of type HtmlOutputFile.
Forms like this don’t work like traditional HTML forms
Standard HTML forms have some kind of form submission action that results in form values being sent to the server, which then results in a page reload.
You don’t want a page reload to happen. That would disrupt the spreadsheet
and just plain look bad. Instead, a click handler is attached
to the OK button. It calls getActivityNote() which obtains the note
of the text written in the text box. It then calls
a server-side function (without an actual form submit) named activityLog().
Both functions could be called anything. It’s the programmer’s choice.
-
Press Ctrl+S (Command+S on Macintosh) to save the file.
-
When asked to edit the project name, enter anything, for example,
sidebar1.
See the sidebar in action
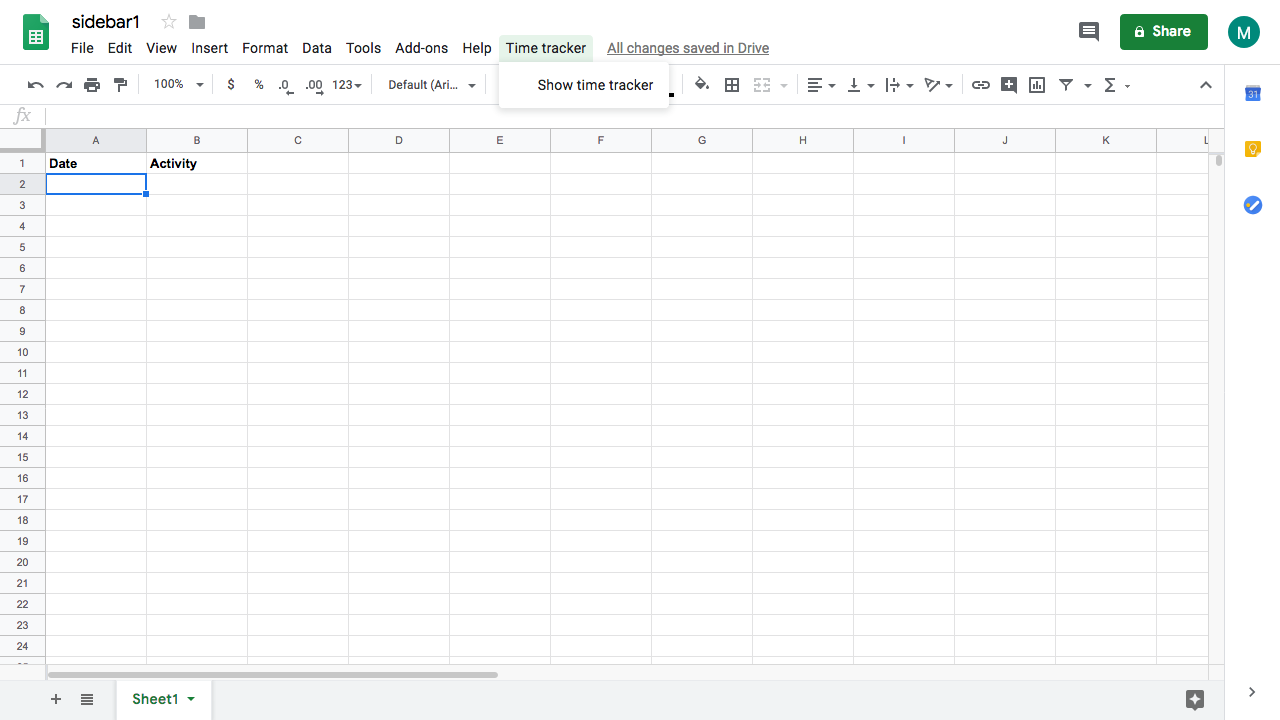
- Reopen the spreadsheet. You’ll see the new Time Tracker menu in the main menu bar:
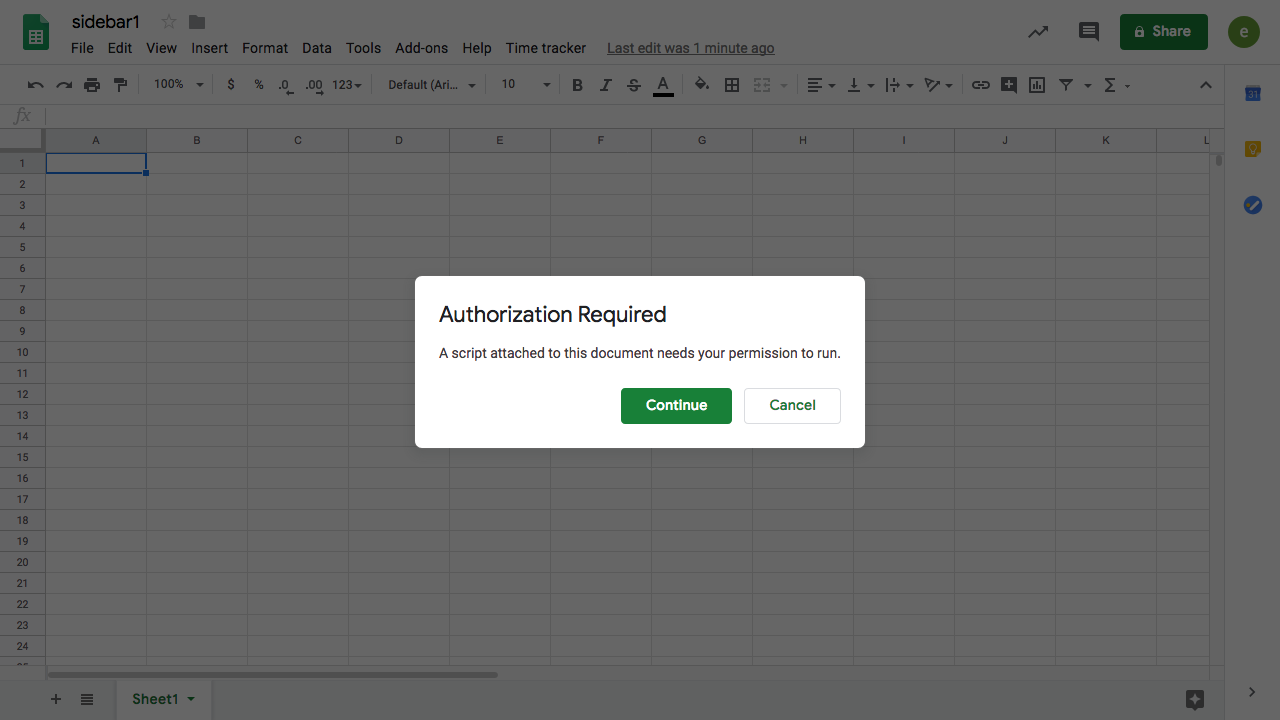
Deal with authorization issues
Google is serious about security. When you try to continue you get a moderately scary dialog:
-
Since you know who you are and trust yourself deeply, click Continue.
-
Choose the menu and you’ll
see its single item called Show time tracker:
- After a view moments the sidebar is displayed:
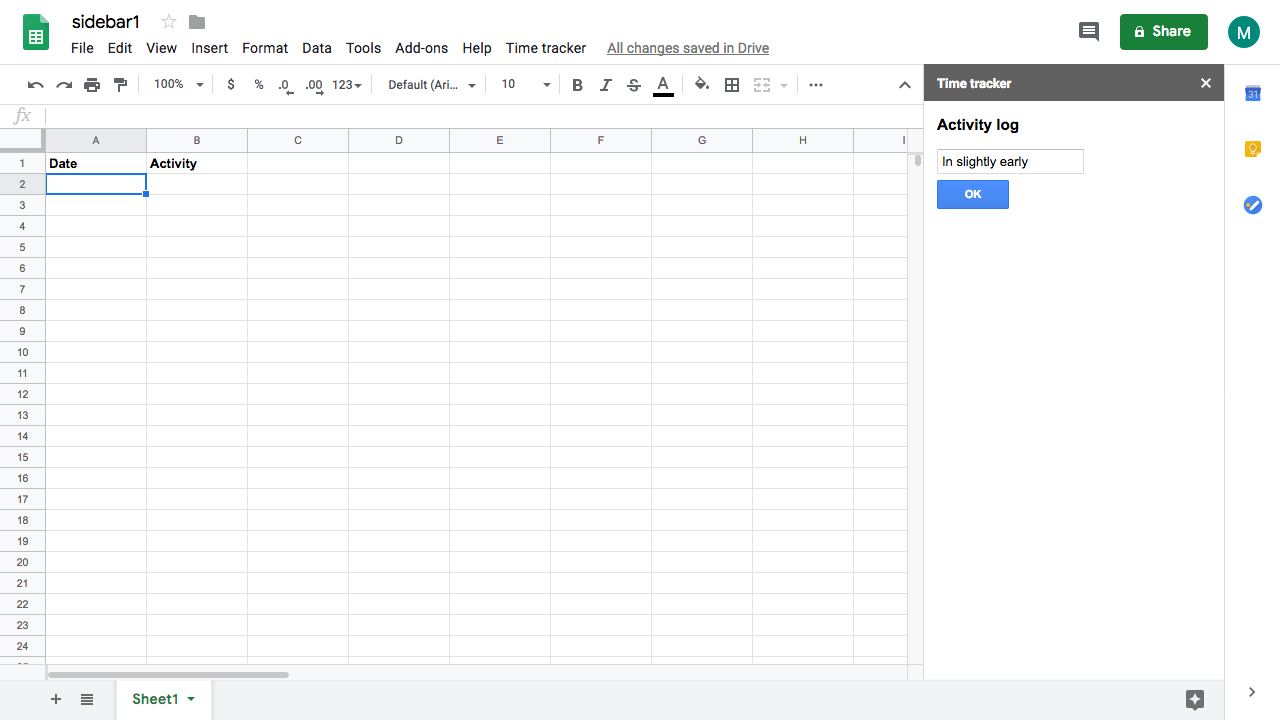
- Enter something into the textbox and choose OK.
It appears in the spreadsheet, with the time automatically inserted into the previous cell.
Congratulations! You’ve built and run something in Google Apps Script that:
- Runs in the sidebar alongside the spreadsheet
- has its own custom form UI written in HTML that lives in the sidebar
- Allows you to enter datt in the form
- Transmits that data to the server
- And updates the spreadsheet based changes you made to the form
Reference
- Code for this article all in one place
- Dialogs and Sidebars in G Suite Documents